So Christine has been rockstar about posting her photos of her creations, but I've got to be honest: Love to cook, but I get too into it sometimes and forget to photograph. My bad, yo.
However, being the Heeb on the site, I found it only appropriate to share the BEST BRISKET RECIPE EVER (cue the echo).
It's called 'My Mother's Brisket' and ran in the December 1995 issue of Gourmet:
Now, here is what it says you need:
a 5- to 6-pound first-cut beef brisket
3 tablespoons vegetable oil
3 large yellow onions, cut into 1/2-inch pieces (about 5 cups or 3 pounds)
2 or 3 large garlic cloves, or to taste, minced
1 teaspoon paprika, preferably Hungarian
3/4 teaspoon salt
3/4 teaspoon freshly ground pepper
I won't go into showing how it's prepped, but I will tell you what I did differently:
1. You so don't need that much oil just enough to coat the bottom of your cooking device, since you get some delicious melted fat to grease it all up.
2. I dumped a few cans of plain tomatoe sauce and cheap red wine on the brisket, and every time I checked on that bad boy, I'd move it around a bit, perhaps flip it, and then dump more of the booze/sauce as I saw fit (or could find in my cabinet) to keep the brisket moist.
Apparently this is one of those dishes you can't mess up. So, with that, I say to you good luck!
Wednesday, July 15, 2009
Sunday, July 12, 2009
i have officially decided upon a favorite cuisine.
i love thai food. i do. especially after having been in thailand for 2 weeks. i really think that i could eat it everyday. and thus i decided to take my love to the next level and attempt what is probably the best known thai dish: pad thai. so i took to tastespotting to search for a great (and relatively easy) recipe. after perusing a few, i decided upon chocolate shaving's pad thai recipe. and i have to say, i loved it. it was rather fantastic and delicious, and i highly recommend it. and plan on using it many, many more times. as always, recipe to follow the pics. oh and as an aside, i would like to take this opportunity to thank my mother for gifting me with a wok a few years ago that i then schlepped back to the states from germany.


soaking the rice noodles.

chicken, garlic, and eggs cooking in the wok. in this part, i changed the recipe and used 2 eggs instead of the designated 3. i just felt like 3 seemed like a lot of egg, and i was very pleased with the outcome.

cooking the noodles, sprouts, and onion in the wok (in the sauce mixture).

everything heating up together.

the final product, garnished with (somewhat) chopped peanuts and a lime wedge. i did not add cilantro as the recipe calls for, only because i did not have any. i did however add chilli flakes, because i like a little spice in my life. delicious!
Classic Pad Thai with Chicken and Tofu (serves 4)
Banh Pho Rice Noodles 1/2 lb or enough for 4 people
4 garlic cloves, sliced
2 chicken breasts
1 teaspoon of sugar
1/2 cup of cubed, firm tofu
3 eggs
3 tablespoons of vegetable oil
2 tablespoons of Fish Sauce
2 tablespoons of Tamarind Paste, soaked in 2-3 tablespoons of warm water for 10 minutes
1/2 cup bean sprouts
4 spring onions, green and white parts roughly chopped
To Garnish:
One handful of chopped coriander
1/2 cup crushed peanuts
1 lime, quartered
Prepare all of the ingredients before you start cooking, as the stir fry process goes quite quickly. Soak the noodles in warm water for 20-25 minutes prior to cooking. Cut the chicken breasts into bite-sized pieces and mix in a bowl with the sugar. In a separate bowl, mix together the fish sauce and soy sauce. Strain the tamarind mixture and add it to this bowl as well. In a third bowl, beat the three eggs lightly and reserve.
Heat a wok on medium-high heat. Add 2 tablespoons of vegetable oil and the garlic. Stir fry for about a minute or just until the garlic browns. Add the chicken and allow it to sear for about 30-seconds, and stir fry for an additional 1-2 minutes to cook. Add the tofu cubes and sear them as well for 1-2 minutes. Pour over the egg mixture and allow it to set for 2-3 minutes. Carefully break up the egg with a wooden spoon. Remove the egg and chicken mixture from the wok and reserve.
Rinse the wok and place back over high heat. Add the remaining one tablespoon of oil, and, when it is hot, add the drained noodles. Allow them to fry for about a minute. Add the tamarind and soy sauce mixture and stir. Add the bean sprouts and green onions and stir the mixture for another 30 seconds. Add back the chicken and tofu, cook for another couple minutes and serve with coriander, peanuts, and lime wedges. Enjoy!
mmmm strawberries....
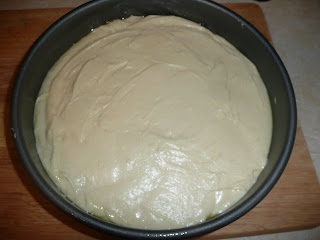
i returned from my fantastic thai vacation just in time for 4th of july, and decided to give pioneer woman's strawberry shortcake cake a whirl for the party i was invited to. and man was it delicious. i pretty much stuck to her recipe (which i'll also include at the end of the post), the exception being that i used a 9" round baking pan instead of 8" because that was what i had. here we go:

mixing the sour cream in.... it may not look delicious yet, but just you wait


mixing the sour cream in.... it may not look delicious yet, but just you wait

in the cake pan. remember, i used 9", and it seemed alright to me.

cooling on the rack. apparently it's normal that it turns this brown on the outside, as it was rather delicious on the inside.

making the frosting. i sifted in 1.5 lbs of confectioners sugar. eep.

the recipe calls to cut the cake in half and make a layer cake. i tried to be all precise about the cutting and even used a ruler and toothpick guides, but i still ended up with one half seriously thinner than the other. this i'm going to go ahead and blame on the fact that when the cake was baking it ended up with a relatively sunken in center, hence messing up my accuracy in halving the cake. next time, i might just split the batter between two 9" cakes so i don't have to deal with the cutting.

the other way i altered the recipe: i don't know if i overused the strawberries, or if using a 9" instead of an 8" pan made that much of a difference, but whatever the case i doubled the amount of strawberries in the recipe. when i began spreading the first pound of strawberries (shown here soaking in the sugar) on the bottom layer, it just didn't seem to be enough. good thing i had bought a 2nd pound of strawberries at the store!

the top of the cake, full of strawberries. now imagine half that amount. not enough strawberries, right?

beginning to spread the delicious cream cheese frosting...

almost done...

viola! strawberry shortcake cake, a la the pioneer woman.
and here's her recipe:
Strawberry Shortcake Cake
Strawberry Shortcake Cake
Cake
1 1/2 cups flour
3 tablespoons corn starch
1/2 teaspoon salt
1 teaspoon baking soda
9 tablespoons unsalted butter, room temperature
1 1/2 cups sugar
3 large eggs
1/2 cup sour cream, room temperature
1 teaspoon vanilla
Icing
1/2 pound cream cheese, room temperature
2 sticks (1/2 pound) unsalted butter
1 1/2 pounds powdered sugar, sifted
1 teaspoon vanilla
1 pound strawberries
Sift together flour, salt, baking soda, and corn starch.
Cream 9 tablespoons butter with the sugar until light and fluffy. Add eggs one at a time, mixing well each time. Add sour cream and vanilla and mix until combined. Add sifted dry ingredients and mix on low speed until just barely combined.
Pour into greased and floured 8-inch cake pan. Bake at 350 degrees for 45 to 50 minutes, or until no longer jiggly like my bottom. Remove from cake pan as soon as you pull it out of the oven, and place on a cooling rack and allow it to cool completely.
Stem strawberries and slice them in half from bottom to top. Place into a bowl and sprinkle with 3 tablespoons sugar. Stir together and let sit for 30 minutes. After 30 minutes, mash the strawberries in two batches. Sprinkle each half with 1 tablespoons sugar and allow to sit for another 30 minutes.
Make icing: combine cream cheese, 2 sticks butter, sifted powdered sugar, vanilla, and dash of salt in a mixing bowl. Mix until very light and fluffy.
Slice cake in half through the middle. Spread strawberries evenly over each half (cut side up), pouring on all the juices. Place cake halves into the freezer for five minutes, just to make icing easier.
Remove from freezer. Use a little less than 1/3 of the icing to spread over the top of the strawberries on the bottom layer. Place the second layer on top. Add half of the remaining icing to the top spreading evenly, then spread the remaining 1/3 cup around the sides.
Leave plain OR garnish with strawberry halves.
IMPORTANT: Cake is best when served slightly cool. The butter content in the icing will cause it to soften at room temperature. For best results, store in the fridge!
** please take note and store in the fridge. i forgot to, and ended up with a sticky, gooey syrup on the counter as the strawberry juice oozed out**
Subscribe to:
Posts (Atom)